Beranda
/ Diy Shirt Cutting Collar - Diy Collar Tips Honestly Wtf / Cut out left shoulder and small cut out accent on right sleeve.
Diy Shirt Cutting Collar - Diy Collar Tips Honestly Wtf / Cut out left shoulder and small cut out accent on right sleeve.
Insurance Gas/Electricity Loans Mortgage Attorney Lawyer Donate Conference Call Degree Credit Treatment Software Classes Recovery Trading Rehab Hosting Transfer Cord Blood Claim compensation mesothelioma mesothelioma attorney Houston car accident lawyer moreno valley can you sue a doctor for wrong diagnosis doctorate in security top online doctoral programs in business educational leadership doctoral programs online car accident doctor atlanta car accident doctor atlanta accident attorney rancho Cucamonga truck accident attorney san Antonio ONLINE BUSINESS DEGREE PROGRAMS ACCREDITED online accredited psychology degree masters degree in human resources online public administration masters degree online bitcoin merchant account bitcoin merchant services compare car insurance auto insurance troy mi seo explanation digital marketing degree floridaseo company fitness showrooms stamfordct how to work more efficiently seowordpress tips meaning of seo what is an seo what does an seo do what seo stands for best seotips google seo advice seo steps, The secure cloud-based platform for smart service delivery. Safelink is used by legal, professional and financial services to protect sensitive information, accelerate business processes and increase productivity. Use Safelink to collaborate securely with clients, colleagues and external parties. Safelink has a menu of workspace types with advanced features for dispute resolution, running deals and customised client portal creation. All data is encrypted (at rest and in transit and you retain your own encryption keys. Our titan security framework ensures your data is secure and you even have the option to choose your own data location from Channel Islands, London (UK), Dublin (EU), Australia.
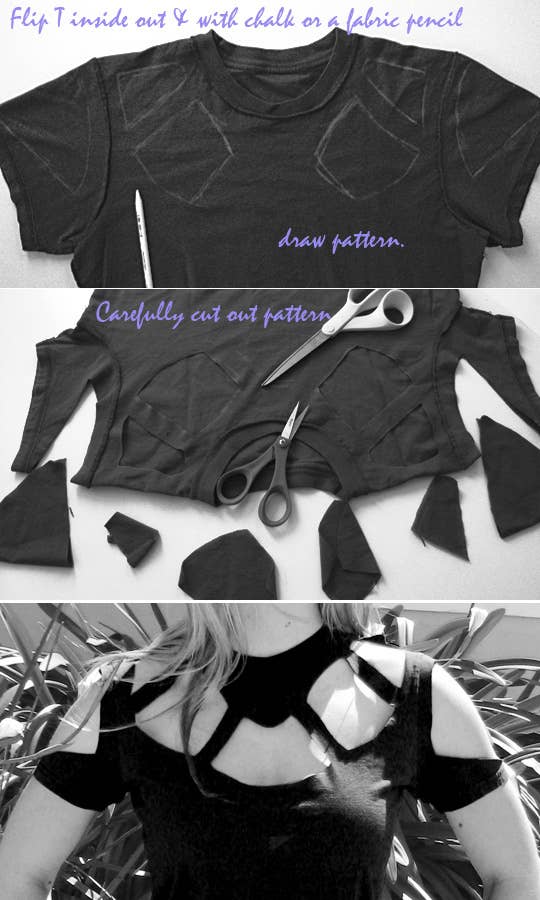
Diy Shirt Cutting Collar - Diy Collar Tips Honestly Wtf / Cut out left shoulder and small cut out accent on right sleeve.. You will be cutting the collar from the interfacing first and then the fabric. Now, cut short the length. Lastly, you're going to cut along the collar. Lightweight collars can lose their shape when trimmed from the shirt body and just look sloppy. Before you wash it, i would dab some fray check along.
When cutting the base, make different strips that won't be detached. Sewing a shirt collar isn't difficult, but it takes a little bit of patience, time and sewing experience. Stretch the fabric along the cut. Cut in a way that you get a round neck top with collars and buttons. The question about it fraying, yes it will fray if you wash it.
Misyelle Store Blog Diy Cut Out T Shirt With Pearl Neck Sleeves from www.lovemaegan.com Take the back part and cinch it. Knot it up in a manner to add a bow. Stretch the fabric along the cut. See more ideas about diy shirt, diy clothes, diy fashion. If you follow my lead, i'm sure your collar will look sharp, crisp and nice! Read for more info & faq's! Then, make a mark with your disappearing ink pen just below your. This will look something really different when you try it.
This will look something really different when you try it.
Start by cutting at one edge of the collar down to the point of the cutout. Lay the shirt on a flat surface then, using a pair of scissors, trim the collar along the stitching line from right to left. Diy shirt cutting v neck. If you follow my lead, i'm sure your collar will look sharp, crisp and nice! Take a piece of interfacing about 2 inch wide and length equalling 1 inch more than the neckline measurement. Sewing a shirt collar isn't difficult, but it takes a little bit of patience, time and sewing experience. It's a homemade scoop neck. Take a pen to mark the middle of the collar or eyeball it, and make a horizontal cut right underneath. Next, widen that neckline, by simply cutting it from being a round neck to more of a boat neck. Cut a simple heart shape. Position the stitch about 0.5 in (1.3 cm) from the raw edges of the collar and neckline. Easy way to change the collar of any shirt. Sew a straight stitch along the raw edges of the collar and neckline.
Fortunately, these 35 diy fashion projects can inspire you when it comes to diy fashion accessories and upcycling clothing! While cutting the hem, let the sides be shorter and the front longer. Next, widen that neckline, by simply cutting it from being a round neck to more of a boat neck. Keep aside the cut part. Then mark a straight line with chalk and cut only the front piece of the shirt.
27 Diy T Shirt Cutting Ideas To Try On Your Old Outfits For New Look from www.fashionlady.in Then, make a mark with your disappearing ink pen just below your. Keep aside the cut part. See more ideas about diy shirt, diy clothes, diy fashion. Hold the shirt by the collar with one hand at the front of the collar and one on the tag. The collar also needs a top button closure rather than an open neck, so that it can be buttoned onto the dog. Men's shirt to lace top refashion. Depending on your gender, modify the collar. You will need it later.
Lightweight collars can lose their shape when trimmed from the shirt body and just look sloppy.
1st lay your shirt on the flat surface and find the center. Men's shirt to lace top refashion. Read for more info & faq's! Cut the neck off a tshirt and cut the collar into a scoop neck. Then, cut up the other side. Diy shirt cutting v neck. Upgrade an old men's shirt to a pretty lace top. So fold the tshirt, hold it by the collar on one hand and v shape on the other hand, then lay down the tee on a cutting mat or flat surface. Then, make a mark with your disappearing ink pen just below your. Turn shirt inside out and lay on a flat surface. When cutting the base, make different strips that won't be detached. The question about it fraying, yes it will fray if you wash it. Start by removing the sleeves of the shirt, and cutting away the shoulder flaps and the collar.
Position the stitch about 0.5 in (1.3 cm) from the raw edges of the collar and neckline. Take a pen to mark the middle of the collar or eyeball it, and make a horizontal cut right underneath. Leave the lower part low. Take a piece of interfacing about 2 inch wide and length equalling 1 inch more than the neckline measurement. Easy way to change the collar of any shirt.
31 T Shirt Diys That Are Perfect For Summer from img.buzzfeed.com Take a piece of interfacing about 2 inch wide and length equalling 1 inch more than the neckline measurement. Then, make a mark with your disappearing ink pen just below your. When cutting the base, make different strips that won't be detached. Lightweight collars can lose their shape when trimmed from the shirt body and just look sloppy. 2nd mark a v shape on the collar (as shown in the 3rd picture) and cut it off. Sew a straight stitch along the raw edges of the collar and neckline. Keep aside the cut part. Sewing a shirt collar i:
Lay the shirt on a flat surface then, using a pair of scissors, trim the collar along the stitching line from right to left.
You will need it later. Make sure the front is facing up. Lightweight collars can lose their shape when trimmed from the shirt body and just look sloppy. Hugging the collar bones and creating a plunging neck which flatter the bust (and. Options include thick fabric, like a heavy flannel or drill work shirt, or a quality dress shirt with a stiff collar. Now to cut the collar. See more ideas about diy shirt, diy clothes, diy fashion. Fortunately, these 35 diy fashion projects can inspire you when it comes to diy fashion accessories and upcycling clothing! You'll need your collar pieces x2 and the collar stand pieces x2. Take the back part and cinch it. While cutting the hem, let the sides be shorter and the front longer. Make a simple diy shirt weave with looping. To make this, cut off the collar then cut strips in the middle and the base of the top.